Well hi all,


over the past four years or so I have

been producing terrain for my gaming

needs well I Have now more terrain

then I need and have to find a new

direction for my gaming hobby.

So I have started to work as a

Mantic Pathfinder.

I love Kings of war , as well as

dead zone and Dreadball, so it was

easy to apply for the program.


So this blog will start with showcasing

my activities with the Mantic pathfinders

program.

There will still be times I will

place terrain projects on the blog

but it will now be the home to the

adventures of a Mantic Pathfinder

in one of the remote capital city's

around the world, Perth Western Australia.


Monday, December 21, 2015

dead zone table part three

Well I have made a bit of progress to the dead zone table.
after some thought and the fact I have a group of tables that have a jungle theme I have decided that I need one built for the dead zone game. now looking at the design so far I can use the table for any of the grid based games from mantic, as well as other games with just not worrying about the grid.
now to update the table
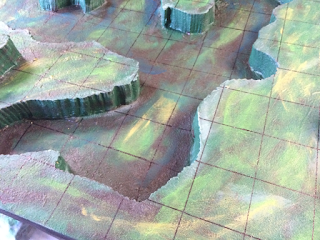
 now I put down a base colour of green and them worked with about 6 different shades of green to put some texture and shading on the surface.
the paints I use fir terrain are just cheap art paints from Bunnings they are $3 a tube and $7 for the better quality. now these are a purchase I make and keep using. I have about 20 paints now and normally add a couple of colours each project.
the other is sample pots from the paint department. as well as miss tints from the miss tint section in the paint dept. sample pot are $8 and you get 250ml, this is what I use to complete large areas. the miss tints give you some great colours you may never have seen.
 
 so laying the colours down in random faction over the surface, I do this the same as a dry brush and add extra layers if I need the colour to be darker.. this gives a natural effect of colour change. now because I use the art paint I keep a spare brush in water ready as if I put to much paint down ,I may not have got out enough colour I just use the wet brush over the top to water it down to a lighter colour.
 starting to take shape
I have also produced some trees for the table they are from the terrain bits box. I now have also painted them to match the table. these would have cost about $10 to produce. now I have also produced some jungle plant for another project.
 
Now these tress are also quiet cheap to produce.
 
 next up was the grids, now the surface has three levels that make the jig I have for spraying down a grid not possible so it is back to a ruler and a artline marker pen. there are a couple of spots where the sqare is not quit right but as a all it has worked out all right.

and finished.

so now I have finished up the grid and next up will be the detail on the table.
 
so up next the cost
well the paints are $3 each and I normally buy a couple each project and continue to use them.
now I did also had to buy a sample pot of green. I also picked up a couple of cheap brushes for about $5 to use. I normally just buy cheap brushes and then through them away after the project. you can keep them if you like.
 
so sample pot $6
paint colours $9
Brushers $5
trees $10
 
so today was $30
 
part two
 
was $8
but $68 if you had to buy texture paint.
 
part one
 
was $53
 
 
so to date
 
$91 with out texture paint
 
now if you want to stop here then you can the table is more then playable and looks great. you can just add terrain you already have and go for it. you can see that the third player  ( the terrain) is ready for use and under $100 ( I may not have mentioned these are all in Australian dollars). now I am going to continue with the project to bring it up to the next level with extra features and detail.
 
Justin


till next time.


Monday, December 14, 2015

part 2 of table

well had a little bit of time this week to work on the table
 well I used a bit of gap filler on the gaps on the terrain, it was about $8 the tub I use will give me some left over for other project.
 next I use the texture paint to put the base coat down this is quiet expensive as it is about $60 a bucket. but this paint has now been used top build 6 tables and some terrain items and base work. so it is cheap in the long run. but if you do not what to by the paint then you can use white glue and sand. as you will need to seal the foam to protect it.


so now it is base coat ready for next stage.
 
so now I have spent $8 on filler
now I did not have to by the paint as I already have the paint left over.


Wednesday, December 9, 2015

DIY Terrain on the cheap

Well hello all
It has been about six months since I have been into the hobby, I have been busy with life .
now after having a listen to the pod cast Counter charge I had an idea to get back into the hobby of terrain making. we have the new dead zone due next year and warpath after that. So I was listening to the episode where they where talking about armies on the cheap and now you can use just about anything to make an army. I think it was build an army on about $5 a week.
well I love to build terrain and I believe you need to have a great table to play on.( the third player in all our games). so I started to look at showing you can really build a great looking table for a cheap price.
Now what I will say that in table will be costed for product only and the tools are one I already have.
I will also say that I do have one advantage as I work for a large Australian DIY retailer so I have the opportunity to pick up the goods a little cheaper. I will through cost the goods at retail price for the purpose of the exercise.

Up first I took a piece of MDF this one came from the scrap pile at Bunnings, so it was only $5, now the size is 4 foot by 2'10" so a little short one side but longer the other. I had an idea so I drew the basic out line on the MDF.

 the next was i took some paint and painted  the different levels with some craft paint this was to give me some idea of the basic outline. it also made it easy to see what I was doing for the photos.

 
 now i picked up some form board from work to use as the basic levels, there is two thickness they are 50 mm and 25mm, they are 600mmx1200mm in size, one was $20 the other was $16. now I had one already left over from another project so i only purchased one this time
next i raided the kitchen and borrowed some baking paper and cut out the stencil for the top level.
 so using a sharp exacto knife I cut out some blocked areas around the areas, now one of the dig things you need to look at is to get the most out of your foam is the position of the parts you need. take some time and use your stencil to work out the must economical use of the foam. you can cut down the stencil to make it work then join the pieces together. i marked out the areas I needed and then got out my trusty hot foam cutter. you can actually make one quite cheaply if you need but I have had mine quite some time.
now as you can see this is all cut out and layered out.

 next was do the same with the bottom layer, again there are gaps under the top layer section will be hollow this helps keep the cost down as you will not need a second sheet of foam. you can if you like spend the extra and have two solid pieces under the top. the difference is I will have to do a little more clean up latter on the base.
next up was design and carve out any extra areas that will need work, in this case the beach head and the jetty will need to be done.
 so worked the jetty and the beachhead, again the MDF I use was from the scape bin at work. but you can pick up a 600x300 3mm sheet for $4 so not two expensive. then just cut it down into the sizes you need. i also took the scape's from the cutting of the second level and added them to the top giving me an extra height an some more levels
 gamer eye view to date
next up was to glue is down and let it set. now i use a water base glue , it is called aquahere, it is not the cheaper version on the white glue as it is $15 a bottle for 1 litre,  but this is a product that you can find others do for as little as $8 a bottle. now this product will be needed later so you will need to get one.

So to date
wood base $5
foam board $36
MDF $4
white glue $8

I now have to wait for it to dry,
it took me about 4 hours to get to this point , but I have the equipment an have set up my work area to make terrain. For an average gamer I would give your self about 6 hours and then let the build dry for about 48 hours.

thanks till next time

Justin

Thursday, June 18, 2015

the table is finished

well I have finished the table for the FLGS, lets hope it is of some use.
I table still has a chemical smell at this moment while the glass coat settles, but I am of the opinion that every time I walk into the store I get that B O smell I feel the chemical smell would be better but If the players do not like it the can just return the terrain and table.


Now I had a rant about the treatment of the terrain I loan the FLGS, well after taking the terrain in on the week end  after the repair, I would say this brings me back to the concern I took in the terrain for them to use. Well the terrain I repaired was spread all over the store and no care was taken to its use. This brings me back to the question, what valve do gamers place on the hobby.
I am in an area where we have a club that meets locally once a week. this is a club that charges its members an annual fee and a weekly charge. this money is used to buy terrain maintain it and pay the rent on the hall. Now the question is if the players have a finical interest in the terrain will they look after it.
where the players at the FLGS get to play for free, so it seem that they have on respect for the terrain.
this time I have put a notice on the terrain to inform the players that it is loan terrain.
well this seems to mean nothing the the players that use it because they just leave it every where.

well food for thought....


Monday, June 15, 2015

table getting there

well I have completed a bit more work it is looking great.


Sunday, June 14, 2015

Terrain building- For FLGS

well I took home a box of terrain that I have loaned to the FLGS, the terrain needed some repair and mantaince work. Here is one of the concerns I have and no matter what you do it seems that it never will change. I laon my terrain to the FLGS in order for the store to build the miniture gamers so we have more players in the commuity, the issue is that these players see this terrain as free for all and do not take any care of it, they just use and dump. They do not report damage and just think that the store will replace it. So here again I go and repair the terrain and return it to the store with the hope that one day people will respect others work.
so I collected this box and bought it home for repair while it was out the FLGS, owner who was not in the store as he owns two and only works this one occasionly contacted me to tell me he lost my terrain, and his store team did not know what happened. Well the owner now has had a talk to his team about the terrain and to be more mindful of when it is used.
I have provided the store with a couple of table tops. I beleive that you must demo and have for use great tables for players to use in order for the games to build interest.


so this is one table of terrain I loaned the FLGS a dwarf table

the orc table I loan the FLGS 

SAM_0855
the ocean table i have loaned them

well while I was talking to the owner of the FLGS he ask if I could build some terrain for the ocean table, I have now been working on some ice style terrain to put on the table.


with luck this should come up a treat for the table. the table has been glass coated so I have had to glass coat the terrain bases for the table.


Thursday, June 11, 2015

Got a Kings of War V2 game

Well I got a V2 game in down at the local Good games in Rockingham -  with the new Abyssal drawfs.


Wednesday, May 20, 2015

2014 Painting challenge

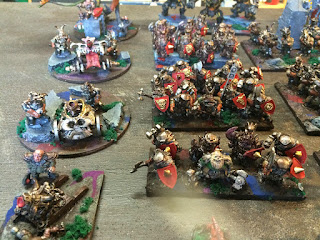
Well it seems that at the begining of 2014 I started a slow grow leauge and painting challenge and over 2014 I was painting Abyssal dwarfs. well I just finished my last model and realized I have not shown of the whole army. so I throught I would put up the photos.