Well hi all,


over the past four years or so I have

been producing terrain for my gaming

needs well I Have now more terrain

then I need and have to find a new

direction for my gaming hobby.

So I have started to work as a

Mantic Pathfinder.

I love Kings of war , as well as

dead zone and Dreadball, so it was

easy to apply for the program.


So this blog will start with showcasing

my activities with the Mantic pathfinders

program.

There will still be times I will

place terrain projects on the blog

but it will now be the home to the

adventures of a Mantic Pathfinder

in one of the remote capital city's

around the world, Perth Western Australia.


Showing posts with label game boards. Show all posts

Saturday, April 9, 2016

deadzone table fininshed

we I got to it and finished the deadzone demo table.

I built the dock and put down the water.

 so painted the blue water area worked out dock location and glued down supports, glued in some pipe heads
then added some white around the areas that waves would form to give movement for the display


so this is what I use, I mix it up and lay it down. I use a pop stick to spread it out


 in order to get the texture I use a cheap brush as I will throw it away . and as the product beginning to dry. this will happen in about 15min from mixing. I will use the brush to rough it up around the painted areas. this will give that area texture.
with the pipes I also wait till it begins to dry and then drop it in the pipes so it looks like it is flowing out
 as the product dries I them use some ink in the mix to give it colour, the ink sinks in a bit and looks like it is floating in the water not just on the surface.
I put extra texture around the leg supports

then done 24 hour drying time and it is game on.


Saturday, January 9, 2016

part four

Well I have been busy with work as I work retail Xmas is busy.

I have been looking at keeping the cost down
First up I have used a add on from the dread ball extreme kick starter for some pieces of scatter terrain. The crates I got of a forum at $1 each
 I have used the box of terrain in the basic game. Now if you buy the box set then this terrain for your table is free.
 Al the trees
with all that I have now put together the basic table with all the terrain to get the table being used.
You just use the number of squares on the table and the area you want and play this means that off the basic table with the basic terrain you can change up the type of terrain for the game from the beach to the caves.


Monday, December 21, 2015

dead zone table part three

Well I have made a bit of progress to the dead zone table.
after some thought and the fact I have a group of tables that have a jungle theme I have decided that I need one built for the dead zone game. now looking at the design so far I can use the table for any of the grid based games from mantic, as well as other games with just not worrying about the grid.
now to update the table
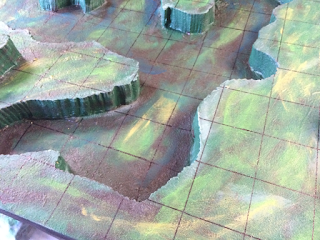
 now I put down a base colour of green and them worked with about 6 different shades of green to put some texture and shading on the surface.
the paints I use fir terrain are just cheap art paints from Bunnings they are $3 a tube and $7 for the better quality. now these are a purchase I make and keep using. I have about 20 paints now and normally add a couple of colours each project.
the other is sample pots from the paint department. as well as miss tints from the miss tint section in the paint dept. sample pot are $8 and you get 250ml, this is what I use to complete large areas. the miss tints give you some great colours you may never have seen.
 
 so laying the colours down in random faction over the surface, I do this the same as a dry brush and add extra layers if I need the colour to be darker.. this gives a natural effect of colour change. now because I use the art paint I keep a spare brush in water ready as if I put to much paint down ,I may not have got out enough colour I just use the wet brush over the top to water it down to a lighter colour.
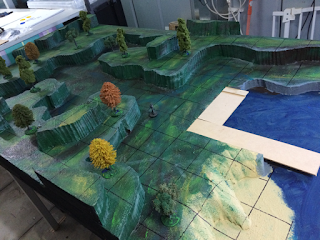
 starting to take shape
I have also produced some trees for the table they are from the terrain bits box. I now have also painted them to match the table. these would have cost about $10 to produce. now I have also produced some jungle plant for another project.
 
Now these tress are also quiet cheap to produce.
 
 next up was the grids, now the surface has three levels that make the jig I have for spraying down a grid not possible so it is back to a ruler and a artline marker pen. there are a couple of spots where the sqare is not quit right but as a all it has worked out all right.

and finished.

so now I have finished up the grid and next up will be the detail on the table.
 
so up next the cost
well the paints are $3 each and I normally buy a couple each project and continue to use them.
now I did also had to buy a sample pot of green. I also picked up a couple of cheap brushes for about $5 to use. I normally just buy cheap brushes and then through them away after the project. you can keep them if you like.
 
so sample pot $6
paint colours $9
Brushers $5
trees $10
 
so today was $30
 
part two
 
was $8
but $68 if you had to buy texture paint.
 
part one
 
was $53
 
 
so to date
 
$91 with out texture paint
 
now if you want to stop here then you can the table is more then playable and looks great. you can just add terrain you already have and go for it. you can see that the third player  ( the terrain) is ready for use and under $100 ( I may not have mentioned these are all in Australian dollars). now I am going to continue with the project to bring it up to the next level with extra features and detail.
 
Justin


till next time.


Monday, December 14, 2015

part 2 of table

well had a little bit of time this week to work on the table
 well I used a bit of gap filler on the gaps on the terrain, it was about $8 the tub I use will give me some left over for other project.
 next I use the texture paint to put the base coat down this is quiet expensive as it is about $60 a bucket. but this paint has now been used top build 6 tables and some terrain items and base work. so it is cheap in the long run. but if you do not what to by the paint then you can use white glue and sand. as you will need to seal the foam to protect it.


so now it is base coat ready for next stage.
 
so now I have spent $8 on filler
now I did not have to by the paint as I already have the paint left over.


Monday, June 15, 2015

table getting there

well I have completed a bit more work it is looking great.


Saturday, February 28, 2015

welcome to the mountain

well I have been working on the link display for the mine table to use to link the bad lands table to the under ground table.

this is an enterace to the hold.

next up will be detail and then the start of the badlands table.